This is a step by step procedure on customizing CScape building materials.
PREPARING TEXTURES
One Set of building materials (one city style) is made from:
-40 texture sets that define shapes
-10 surface texture sets
-10 blinds sets, 6 interiour sets
Every Faccade Shape Set is made from:
-40 Mask maps
-40 Ambient occlusion textures
-40 Blinds gradient textures
-40 Depth map textures
-40 Normal maps
Every Surface Texture Set is made from:
-Albedo Map
-Normal Map
-Metallic Map
-Roughness Map
Adittional texture Sets:
-6 Enterier maps
-10 blinds maps
-Dirt maps
-Illumination maps
One of main things that actually define quite well how your city will look are Shape Textures. They are most complicated to make, but they give you a lot of power when dealing with city look. Next section explains their meaning and authoring.
-Before modifying any textures, locate Assets/CScape/CDK(content developement kit) folder, and unpack CScape_CDK_Texture_Sources.unitypackage to it’s default folder.
-Find Assets/CSCapeCDK/Editor/Resources/MegaCity folder, and duplicate it. Rename it to a package name that you want to use (For ease of use I will be refering to “YourPackageName” name)
Now lets see how we can modify some textures.
MASK MAPS:
Mask maps look somethnig like this:

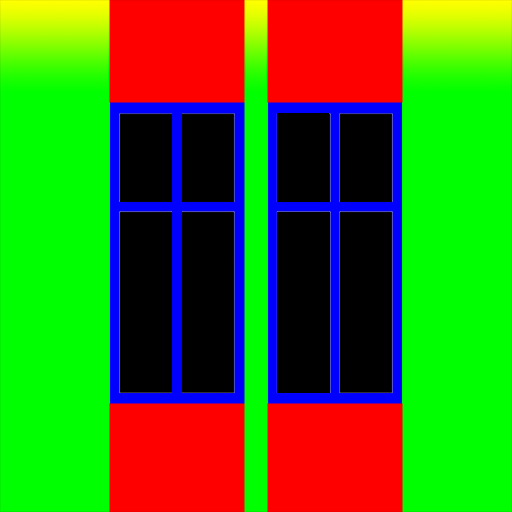
This texture defines assignement of materials on a single faccade patch. This is define by usage of 4 colors.
Red Color: First Wall surface material
Green Color: Second Wall surface material
Blue Color: Window border (this zone will take colours from two colour values set in material shader
Black color: black color defines areas that will have transparency-glass surface. Be sure to assign absolute R0 G0 B0 value to this area.
TIP: you can sometimes use blended values for Red and Green channels – this is a good way to have blended materials on a single faccade
You should place this textures in PNG format in: Assets/CSCapeCDK/Editor/Resources/YourPackageName/Mask folder
and name them with this naming convention: diff_001.png, diff_002.png…. diff_040.png
DEPTH MAPS:
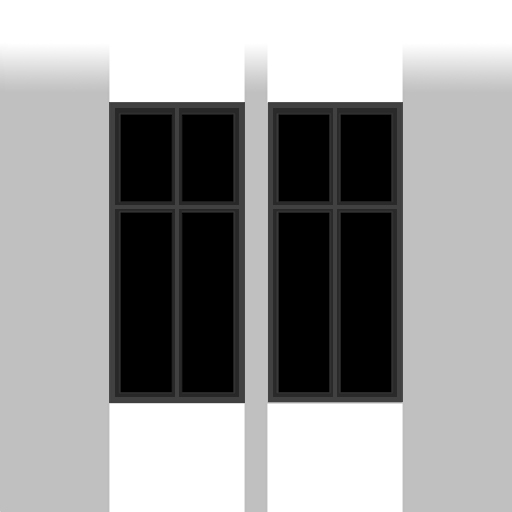
Depth maps are maps that tell CScape how to extrude building shapes and make them look three dimentional. White color is a max extrusion surface, while black color is retracted surface. Note that all windows surfaces has to have black color assigned to them – otherwise CScape won’t know where to place windows.
Depth maps look something like this:
You should place Depth textures in PNG format in: Assets/CSCapeCDK/Editor/Resources/YourPackageName/Depth folder
and name them with this naming convention: depth_001.png, depth_002.png…. depth_040.png
If you use Substance Designer, HERE you can find a Substance Designer template that can use DepthMaps to generate Normal and AO maps.
This is a result of Depth map displacement: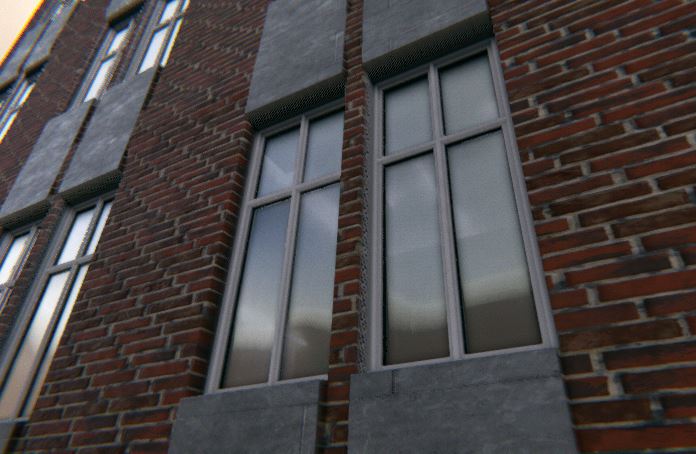
AMBIENT OCCLUSION MAPS:
AO maps look somethnig like this: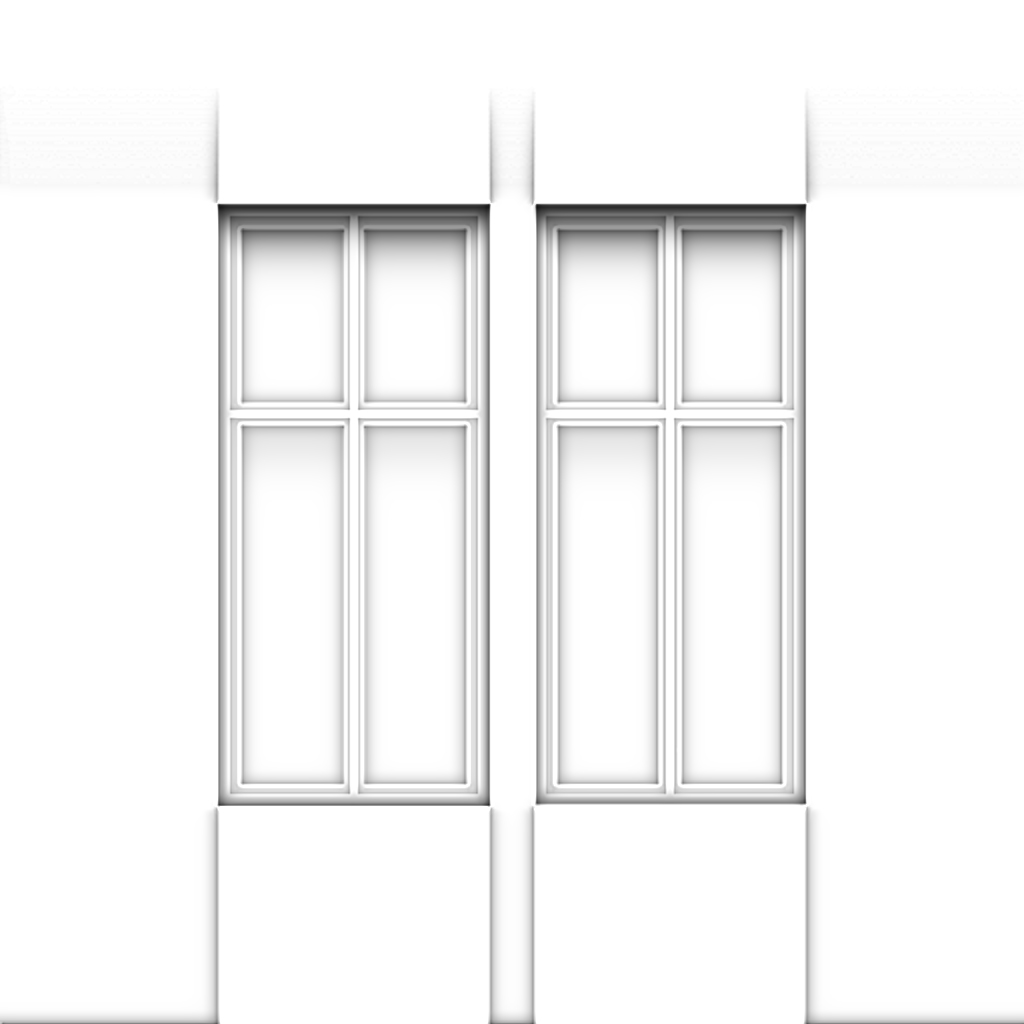
This should be a standard AO map made in your preferred software. If you use Substance Designer, HERE you can find a Substance Designer template that can be used to generate AO maps from a user provided Depth Map.
You should place AO textures in PNG format in: Assets/CSCapeCDK/Editor/Resources/YourPackageName/AO folder
and name them with this naming convention: ao_001.png, ao_002.png…. ao_040.png
BLINDS GRADIENT TEXTURES
Blinds gradient textures are grayscale images that define how blinds can open and close. Blinds gradient textures look something like this:

They use gradients to define a possible elevation of blinds by using grayscale gradient. White color stands for opened blind, while black for closed. Any in-between grayscale value is transitional value, and defines possible sliding of blinds (direction and possible values). Example: gardient starting black on upper side, and going to white down, will make blinds open in UP direction. You can use also horizontal or circular gradients for other opening schemes (usefull for some Sci-Fi like or Post-apocalyptic buildings)
You should place AO textures in PNG format in: Assets/CSCapeCDK/Editor/Resources/YourPackageName/BlindsGradient folder
and name them with this naming convention: depth_001.png, depth_002.png…. depth_040.png
NORMAL MAPS
Normal map textures are a standard normal maps. Best (or easiest) way to generate them is directly from Depth Map. If you use Substance Designer, HERE you can find a Substance Designer template that can be used to generate Normal maps from a user provided Depth Map.
Normal maps look like this:

They are generated as any normal maps for unity. notice that I’m adding some normal pertuberation on glass – this serves to give a nice realistic reflection.
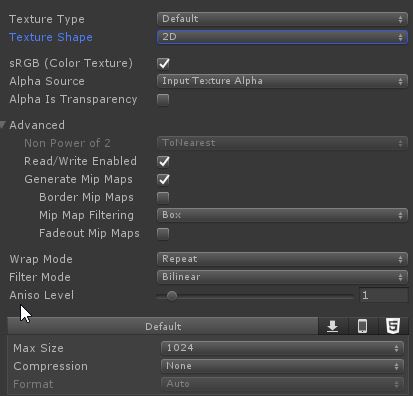
When importing Normal Maps into unity, be sure not to set them to Normal Map type, but leave them as Default Type in map importer settings. Also, notice that all textures have to be set to Read/Write Enabled and their compression turned to None.
You should place Normal map textures in PNG format in: Assets/CSCapeCDK/Editor/Resources/YourPackageName/Normal folder
and name them with this naming convention: normal_001.png, normal_002.png…. normal_040.png
Texture ordering for all shape textures:
Not that you have to follow some ordering logics when saving textures.
-First 20 textures (from 001 – 020) define floor shapes with windows. These textures will be used for texturing all floors except street level floors. Each texture will correspond to a patch that is 3m x 3m in world space. (keep this in mind when autoring textures)
-next 10 textures (from 021 – 030) define shapes used to define empty walls (walls that doesn’t have any openings). But this doesn’t mean that this slots can’t be used also for adding some other windows (maybee a smaller ones).
-next 10 textures (from 031 – 040) are used for texturing Street Level Faccades. They are different from first 20 textures in a way that they will be scaled differently than floor textures. Each texture will correspond to a patch that is 6m x 6m in world space. They actually cover two floors.Avoid at adding any window in a horizontal middle of this texture (to avoid uggly clipping of windows when resizing buildings).
COMPILING TEXTURES FOR USAGE WITH CSCAPE
Once you have all textures ready, you will have to compile them for CScape (this action creates 2d texture arrays, and combines all texture channels in less textures).
You have to use CSMaterialTools script that is attached to CScape city object.
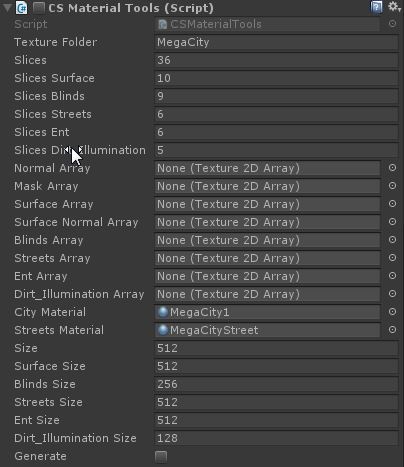
-Activate script
-Set your Texture folder name to a name of your Style package (same as YourPackageName folder)
-If you want to modify original MegaCity1 material, you can do so (but you will loose original material – but you can always recompile this one afterwards). If you want to keep it, duplicate CityMaterial, and set it in a City Material field.
-Click on Generate button. This will compile all textures and assign them to your material.
Note on texture resolution when autoring:
Textures can have any resolution accepted by unity. Probably the best way to make them is to make large textures, and let CSMaterialTools resize those texture to your needs)
Coming soon:
Modifying other textures and modyfying building mesh templates.

